Sunday, 2 November 2014

Spaghetti v Pompom

Miniature Pompoms
Now I love a pompom or 2 and I've tried many an implement to make them, as you will know from one of my previous posts, but when I was stuck and bored and wanted to make something, I tried to make my own out of 2 metal skewer sticks! I know not the brightest idea, but I honestly thought that if I had a circle with 2 halves it would be easy! Then I read about making pompoms with a kitchen fork. The results are fantastic and to be honest I think they are better than using any of the pompom makers that I have purchased.


So to get started you need a 4 ply or DK wool, i haven't tried anything thinner, but i find these work best for pompoms to get the fluffy effect. A normal dinner fork or a large salad fork if you wanted to make a bigger pompom are all that you need. Then you get an approx 6" length of the wool and put it through the middle prong and hold it in place with your thumb. This is needed to tie the other end together to secure. Then you just wind the wool around the fork, as if you were winding up spaghetti. I did this 50 - 60 times to get a denser pompom, but if you wanted a smaller and thinner pompom 30 - 40 would be fine, but not less than that, otherwise you won't have any wool to trim afterwards. Once you have wound the wool like spaghetti around the prongs of the fork you then have to cut and tie the to lengths together on the side of the fork. I did this in a double knot just so it doesn't come apart.

Then you need to push the wound wool up the fork so that you can thread some wool in the prong and over to get a bow effect. So to do this you need a short length of the wool or a matching thread that is quite strong  and tie this through the middle
 prong as shown and i found that if i tied this at the front and again at the back it gave a stronger hold. Do not snip off this tread as you will need this to either sew onto jumpers etc, or as i do to tie onto parcels, presents etc.

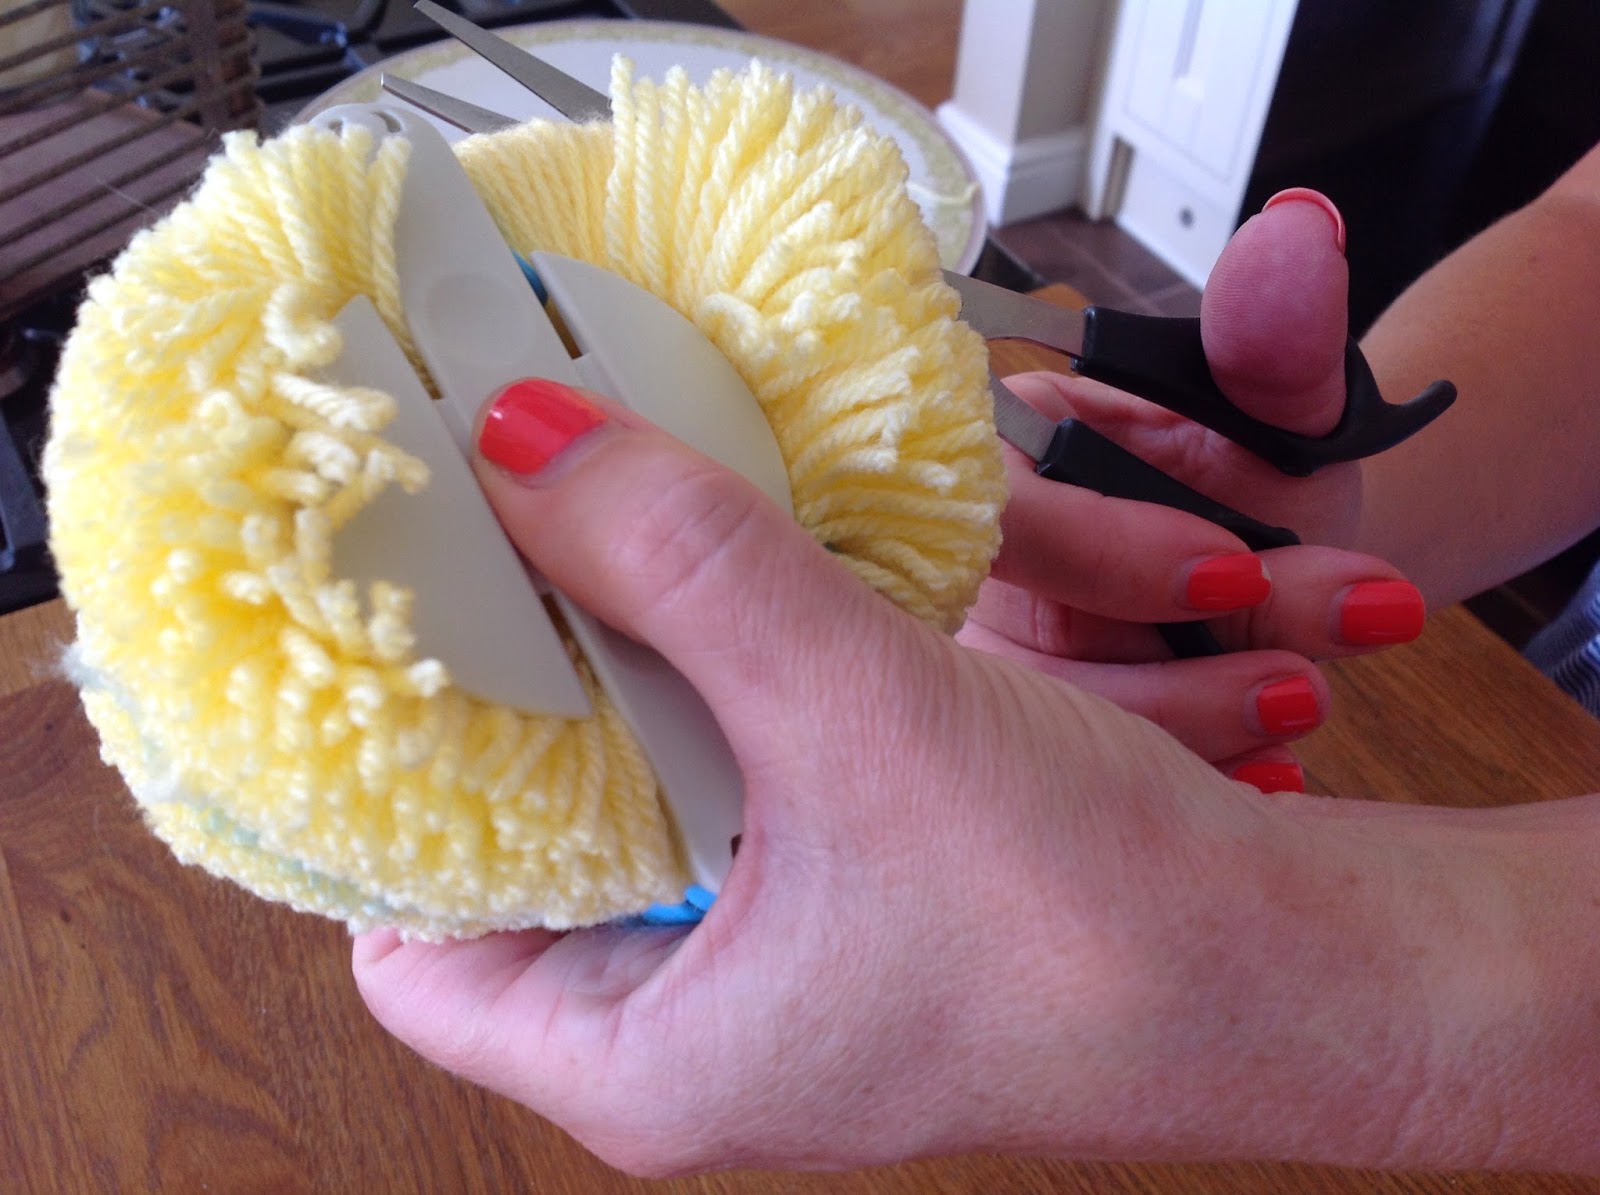
Then you take the bundle off the fork, snip off close to the knot on the side the threads that you tied to hold in place, but not the threads that you tied and then as with a pompom maker start snipping around the looped edges, being careful not to snip your middle threads (believe me its easily done!) I found that it was easier to do this with a thin sharp pair of hairdresser scissors so that you can get into the little bundle and not spoil or snip the middle thread.


Once you have snipped all the edges, hold the pompom quite flat so you have the dense part in your fingers and then start to snip off around the edges all the long threads and you will start to see the pompom taking shape. If you are happy with your shape after this then just take the long threads and give the pompom a good shake to get the ball effect and you have a mini pompom. I prefer to then carry on cutting the pompom all over giving it a good hair cut so that the pompom gets a denser effect 
and you end up with a pompom massacre on your hands. All the trimmings can be kept in a plastic bag and then mixed in with your stuffing for other projects or save it up and in the spring put it on the grass for the nesting birds to use. A win win situation for all those involved in the addictive process of pompom making.


Remember you can follow daily updates on my Instagram page by clicking on my pushbutton about my little world, or Facebook www.facebook.com/beautifulandhomely about Beautiful & Homely and upcoming events or pop into my online shop for a world of handmade goodies, Shabby Chic gifts, Vintage and Retro delights www.beautifulandhomley.com

Wednesday, 6 August 2014

Wherefore art thou?

So i have neglected you my Blog for nearly an month, i'm sorry but i have my reasons........

The most important was my birthday way back in July, god that sounds like it was months away, but on reflection it was only 12th July, where have those weeks gone?

I also have fitted in House Sitting for a friend in Eastbourne as they have a new puppy and that was quite eventful, no electric for a whole day and a cat that got stuck on another house-owners roof, quite an eventful full days, and without my trusted sewing machine, i was starting to go stir crazy and i was feeling trapped as i didn't take my car either due to taking the train, but i did catch up on my book club reading and catch a few rays before i go on holiday later this month.

So as you may remember i was making bits and pieces to hang up including my bunting as shown in a previous posting and then i made the Laura Ashley www.lauraashley.com paper pom-poms that i had bought in their summer sale. Whilst they were quite easy to make, i think if i was honest that i would not have paid the £10.00 that they were originally, but the £7.00 in the sale seemed fair, but they were effective and i have used them since at my Opening Event for Beautiful & Homely www.facebook.com/beautifulandhomely 

This is my new business for selling online Shabby Chic and homemade items (webpage being created) and also Home Parties and over time i will be adding dare i say the word..... Christmas decorations, some are already on there! The idea is for people to be able to buy small objects of Shabby Chic for their home and garden and unusual gifts. I have been selling via Instagram - link on Blog and also Facebook, along with many pictures of all the items that i have at the moment. I also had an Open Day Event on 2nd August to show off the items that i am selling so that my customers can see the quality of the goods that are for sale and also to talk about the ideas for the parties or coffee mornings. I am also going to be working 4 days from September so that i can concentrate on the business and find some customers who would be interested in having a Shabby Chic Home party. Another idea is to be able to invite customers who prefer not to host a party come to my home on a Friday where they can by appointment browse the items and for  £3.50 have tea and cake in vintage tea cups and saucers giving the whole Shabby Chic effect.

Just a small showing from the Open Event


So this a short synopsis of why i have neglected my blog for nearly a month, i promise that i won't be doing that again, as today to teach me a lesson it has been playing up and not playing ball with the type and pictures and instead of the normal 30 minutes or so it has taken up most of my morning playing around with type, pictures, justifying, undoing and getting advice from the virtual friends on Instagram....but hey i've posted, it maybe short and sweet but its done, and the rest of the day is mine to sort before jetting off.....................


Sunday, 13 July 2014

Cry Baby Bunting

So i have neglected my Blog for a few weeks, but i have my reasons, and no not being lazy, if only.
I have been busy with birthday celebrations and i went away for a long weekend to Spain, but normality is resumed this late on a Sunday night and i have today completed the bunting that i started as my project a few weeks ago and mentioned in a previous post.
So as a novice and with a new sewing machine for my birthday i thought what could i try to make that wouldn't take too long and would have good visual effect and that nobody would have to look too closely to see my mistakes...............bunting! 

I first sourced in a charity shop a few weeks ago some lovely chair back and arm covers for 80p, and when looking at them noticed that if i put a triangle template on them i could keep the embroidered pattern and use as the main focus for the bunting and still giving a vintage feel.
Charity Shop Finds

Bunting Template - Large
I then downloaded a bunting template from www.housetohome.co.uk which had 2 different sizes on the template, i chose the larger flag as this allowed for the floral pattern, but i have since cut smaller bunting in a striped fabric. and then pinned onto the chair cover. As i had 7 covers i cut all 7 and then as they were too thin for bunting i then cut another 7 for backs and then another 4 in plain to make up 2 extra, 1 for each end to make the bunting longer. I used pinking shears that i had bought at Hobbycraft. Of course your bunting can be any length and any assortment of materials, but i wanted to keep the theme of the vintage chair backs. Once i had all the triangles i then pinned all of the backs to each one.

Next it was time to get sewing with my new Brother LS14 sewing machine. I must admit i did have a few problems 
with this machine and the bobbin kept sewing loose stitches so a few swear words were thrown into the equation, 
but after a bit of practice and finally sorting out the bobbin i was well away and sewing the triangles in a matching 
green thread as a contrast  against the white material and picking out the green from the flower stems.

Brother LS14 Sewing Machine
I was going to use ribbon that i had bought previously from Aint Too Shabby who you will find on Facebook and 
Instagram, but it was 2.5m long and not long enough for the amount of flags i had made, so i went to my local 
haberdashers in Coulsdon - www.artandcraftvalley.com  and bought 4m of 13mm bias binding. This is a tip i will
remember for future use and i will probably keep the bias binding in my stock as it was easy to use and comes in 
longer lengths than a reel of ribbon and isn't too expensive. 

I then ironed the bias binding in half and placed each flag 4" apart, pinning as i went but you can do them closer, its
up to you, but they must be evenly placed, i also left 40cm at each end for tying to trees etc, but again you can 
extend on this. Once i got going with the sewing machine and remembering to take out the pins before they went 
under the foot of the machine i was well away and the bunting was completed, not to perfection, but not bad for a 
first attempt.

Triangles ready to Go
Pot - Waitrose
Pinned, ready to Sew
The Finished Product

Monday, 30 June 2014

Wow I Need A Day Off

That's it, i've done it, from September i will be working 4 days in the office at work and then on a Friday it will be me and my new goodies, along with the scarves if they behave themselves in the big world of commerce and small business - yikes!!! I will be starting with a small shopping event at a local school in July and then i am going to be doing a table top stall at a children's nursery during the school holidays to get the feel of it all - small apples grow into big trees and then the nursery - Little Lambs have offered for me to go along every Friday to get myself established. So i hear you ask what are you going to be selling on this new venture of mine? Here are some of the pictures that i have loaded so far out  of the vast amount of stock that is residing in my kitchen, all tagged, priced and ready to go.
Sass & Belle Hanging Decorations

I already had have these type of hanging decorations in my home all year round and at the moment they  are brightening up my bookshelf in the office, just simply hanging there on cup-hooks, which then means i can move them around to suit, or change them over with other hanging decorations. 


I will also be selling these beautiful bags and coin purses, the purses are quite large so could also be used as a makeup bag for the essential bits that you carry around with you in your bag, or a pretty way to disguise your monthly items, that always seem to end up falling out at the most impromptu moments!
Sass & Belle Butterfly Canvas Bag
Sass & Belle Canvas Coin Purse

I have picked out a few vintage inspired items that are cheap and to encourage people to look at my stall. I always find that when i go to shops, stalls etc i feel overwhelmed when i can only see the expensive items, and i just walk away. I want my customers to feel that they can browse and still take a little something away with them. Hopefully they will feel good that they are helping a small business and i will feel happy that i have made their day a bit cheerier! 
Vintage Notebooks x 4 Designs
Curiosity Hooks x 3 Designs
Vintage Inspired Bird Tin
Would you buy these items, would you like to buy any of these items? i can be contacted via my Instagram or Facebook or leave a comment below.

Wish me luck :)

Wednesday, 25 June 2014

Busy Bees Don't Watch Footbal

So that's it my teams pulled from the sweepstake bag are out of the World Cup, first Spain and then yesterday Italy, but to be honest by the end of last week i had given up and decided to resume with the crafting that i have been doing whilst trying to watch the football.

So i have been working on a few projects since the last posting, but none have been completely finished as i was waiting on getting a sewing machine that i had asked for my birthday. So i have been cutting and preparing and stocking up on all the items that i have needed, along with collecting items along the way. I will post the finished bunting next week with full instructions, along with a stripped one that i am making from a reduced Fat Quarter bundle purchased in the +Hobbycraft sale, which has some great reductions at the moment and if you join their Craftclub on the first purchase with a code you get an additional 15% off, so stock up - Christmas is coming, yep they had reduced Christmas craft items.

Vintage Arm Cover from bundle found in Charity Shop
Pinning out over the flower design
Triangles cut out ready

Whilst i am in this busy bee preparation stage i purchased a copy of Craftseller Magazine where all this months templates can be downloaded from their website www.craft-seller.com/magazine and i have decided to make the Bathing Babes and 
Beach Hut, which was influenced by finding lots of felt scraps and squares being discarded at 
work this week, nothing a gentle steam with the iron didn't fix and they are all back to normal. 

Shop till you Drop

Last weekend as the weather was so sunny i took a  cheeky trip to Brighton wearing my new Laura Ashley Sails dress that i got in the sale a couple of weeks ago, but i must say the way that Laura Ashley go about their Collect from Store service needs a revamp. They email you to say the order has been despatched, but then there is no other information apart from you then having to track your order via the link in the email (which i did not receive in mine) and then you have to pay a guessing game and guess which day you are going to go and see if the delivery is in. This is not 21st century and to be honest i don't think i will use this service again www.lauraashley.com/Summer-Sale
Dress - Laura Ashley Sale

Whilst i was in Brighton i went to my favourite shop The Red Gecko which is just off the lanes www.theredgecko.co.uk and noticed that they were selling the same scarves as me, but for £15.00 each! So i do seem to be the cheapest in the area compared to other shops as mine are £10.00 with FREE UK P&P. All scarves can be purchased through my Facebook - simplyscarves or through my +Instagram link on the blog widget simplyscarves


I had seen the last time i visited Brighton a light shop called Cable & Cotton which sells the most fantastic idea for fairy lights www.cableandcotton.co.uk where you select any colour cotton balls that they have in tubs around the shop and make your own variety ranging from a 20, 35 or 50 light string. These lights are very attractive and because they can be changed over the colour schemes are limitless. 


Sunday i went to a large car boot sale in Pease Pottage which is just off the M23, J11. I initially went to see what it was like as i have so much stuff to sell and i was amazed at how busy it was. There were people coming out with bags full of items and returning to their car to then go back in again, which i admit i did that too. There were so many bargains to be had there, that to get rid of my own items i am going to have to either avoid this one or bite the bullet and let items go for very cheap. I like to find bargains myself, but i do not like to give mine away.


As you can see i managed to get quite a little hoard for myself, which will help me when i eventually get around to sorting out my +Etsy page www.etsy.com/your/shops/anyoldchina but for some reason the pictures that i have taken on my ipad do not transfer over to Etsy too well and i am going to have to retake all the pictures and start from scratch, but i think i am going to leave that until i finish work for the 6 weeks holidays and then i will have more time to concentrate and work out where i am going wrong - fingers crossed otherwise i have another project for all the china i have accumulated that i do not want for myself - watch this space! 


Thursday, 19 June 2014

Pom-Pom Bunting


So last week i said that i was making pom-pom bunting and this week it is finally finished in-between the football, working, decoupage (more of that in another post) and life.

These colourful beauty's had been sitting around for a while and were initially being made for a friends Bollywood Party, but that has fallen by the way, so i thought what can i do with them, and then lightbulb moment - use them for your own birthday BBQ in July, so back out they came this week and now as you will see it is finished and ready for sunshine, showers and good old British BBQ fun.

If you want to make this pom-pom bunting, it is so easy to do, and you can make the pom-poms in various sizes by using the Clover Pom-Pom Maker that i first saw on the Channel 4 show Kirsty's Homemade Show and was sold out every time i went to +Hobbycraft but patience paid off and now i am pom-pom crazy. Each pack has 2 pom-pom makers, i used the Large, which consists of 2.5" and 3.3/8"


Then i used 3 large balls of various coloured wool, on special offer in +Hobbycraft buy 3 pay for 2 and this offer is still on, but any wool is fine, but use double knit, one its thicker and 2 its quicker, especially when making tri-colour pom-poms. Then you open the maker on one side and wrap the wool around until you have approx a 0.5mm gap (see picture) snip off the wool and close that half. Then proceed to open the other half and repeat. Once this is done snip off from the wool and length to tie around the middle,  snip around the wool across the middle (like when you used to make them with 2 cardboard rings and then wrap the wool length around the middle and tie with triple knots to keep the wool in place. Open each side of the pom-pom maker, pull away the middle sections and then fluff up the pom-pom, trimming away the excess wool and loose ends.


Now you just need to make as many pom-poms as you want for your bunting i made 17 that go across a 6" fence panel, i wouldn't do more as the weight is quite heavy, but you could make a few to give a really visual effect.

I used 3mm satin ribbon, again in the bargain bin for £2.00 for 7 metres and a large eyed weaving needle, again for ease i went to +Hobbycraft but all items are available in other craft and on-line craft stores. I tied a knot in one end to stop the pom-poms moving and then proceed to thread them through, don't worry about even spaces at this time as you can dress the fence once you have them threaded, but do not cut the ribbon until all are threaded and you have measured your panel or where you want to hang the bunting. Once threaded and you have the length, knot the end and cut off leaving enough each end to make a hanging loop - then voila! 

Dish full of pom-poms
Satin Green Ribbon
Prym Weaving Needle

Colourful cheap and effective bunting made for £8.00, not bad considering what you would pay in the shops, and a great way to while away the football for the next few weeks.


Monday, 16 June 2014

Manic Monday Madness

Dachshund £7.00 70" x 40"
Parisian Scene £7.00 70" x 40"


Colourful Butterflies & Flowers
£7.00 70" x 40"

Paisley in Green £7.00 70" x 40"
Today i thought that i would go a little bit crazy and have a rush sale on some of my scarves, this is only some of the designs that are in the Manic Monday Madness sale, others included can be found on my +Instagram SimplyScarves. 

All scarves are FREE UK P&P and it is only the designs shown today on my blog or Instagram that will be in the £7.00 sale. Please email me with any questions - simplyscarves@hotmail.com All payment is via PayPal where i will invoice you, once payment is received i will then send out your scarf by 1st Class post.

Sunday, 15 June 2014

Living in the Fast Lane

Scarf - Simply Scarves £10.00
Clutch - Charity Shop (Accessorize)
Bracelet - Lucky Dip
Clogs - Lotta from Stockholm
Linen Dress - Epsom Market
Mirror - Recycling Centre


So in my last post i told you what a busy week i had had and it all started last Sunday when i was going to London to meet my partners cousin from South Africa who is over for a period of time and also happens to be the author of the fantastic blog www.anaestheticadventure.com

As it was such a hot day deciding what to wear was turning into a bit of a chore, but then i 
remembered that i had received my beautiful green Matilda clogs from www.lottafromstockholm.com on the Saturday 
and decided to match them with my flowing white linen dress that i had purchased from Epsom Market a few weeks 
before. As you can see the clogs look casual and great. Then i thought i would then tie it all in with a bracelet that i 
had won the previous year at the School Fayre and a brilliant charity shop find of an +Accessorize zig-zag pattern 
clutch that had all the colours and was the final touch.


The rest of the week i have been busy visiting charity shops picking up bits and pieces, some for my collections and others for my project that i had mentioned to be unveiled in a few weeks, but one of the items that i did find and that i have quite a few of is this fantastic bowl, i love the designs on the bowls and i'm sure they were used as a Christmas idea for smellies by either Boots or BHS, but nether the less they are finding there way to charity shops up and down the country, as i discovered recently via my +Instagram with other followers who have the same interests as me.

I have a birthday coming up soon and as it is in the summer i have also been planning that and keeping my fingers crossed that the weather is going to be fantastic, so i have been buying craft items to make large paper flowers for decorations, making colourful pop-poms using +Hobbycraft Kirsty Allsop Pom-Pom maker, but as you can see i have a few more to go before i have enough to make a long bunting - better get cracking!

And the final end to my busy week has been putting up a Fern Willow fence to cover up my neighbours horrible green chicken wire fence that i purchased from +B&Q and has now enhanced my country cottage flower bed that i have been tending to for the past 3 years along with house renovations, but the end is in sight and the flower beds are going to really colourful this summer and have already started to attract so many bees and insects, but sadly there seems to be a lack of butterflies this year, which is a real shame as i am a member of the Butterfly Society Great Count and so far i have only seen Cabbage Whites.

So now i am exhausted and already we are about to start a new week, hopefully the summer is here to stay and you will get to see all my craft projects in the coming weeks.

Don't forget to click on the Eiffel Tower to add me to your +Bloglovin, follow me on +Instagram - Lemonfeatures or like my Facebook Page - SimplyScarves. 

Remember all Large Scarves are £10.00 each free UK P&P, £8.00 each for 2 or more, or the small scarves are £5.00 each all payment via PayPal

Tuesday, 10 June 2014

Come Shopping


I apologise for my hasty blog the other day with regard to this shopping event that is taking place on Saturday 12th July (my birthday) but i wanted you all to make a note in your diaries and come an pay me a visit and look at my lovely scarves in the material (flesh).

Along with myself - Simply Scarves, there will be other stalls to browse and purchase from, so if you are looking for a gift for somebody or maybe a Teachers present for the end of the Summer Term, this would be the ideal place to help support us small businesses and purchase an original homemade craft item.

Another reason for not blogging this week is that i have been busy on other projects that i will unveil in the next few weeks and has had me running around all over the place, trying to work out how all this new technology works, but it involves an online shop on +Etsy which will be called "anyoldchina" so watch this space for the updates and progress.

Remember you can follow me on +Facebook+ Fan Page  - simply scarves, +Instagram - lemonfeatures and +Twitter - lemonfeatures remember to add me to your +Bloglovin so you can receive my updates.

I will also be updating the front page on my blog as it looks too busy and needs a revamp, but of course this all takes time and as a 45 technophobe its a learning curve especially when you are fighting your partner to get the computer!


Saturday, 7 June 2014

And They're Off


Hunter Royal Horticultural Society Wellies 

Today i went to the Epsom Derby and what a dilemma i had on what to wear. The weather was predicated to be thunder storms, heavy rain and even a weather warning had been given all week - was i to wear my #hunter +RoyalHortSocietyVIC wellies? Or was the rain going to stop and i could get all glammed up and not look like i was going to a festival?


Armani Exchange Dress 
Clutch - Dune iPad Case
Shoes - Dune Decorum T-Bar in Pewter
Fascinator - Debenhams
Pandora Stacking Rings
Ray-Ban Wayfarer Sunglasses

As you can see the sun came out and i was glammed up and ready to hit the race track. I was going to wear a white summer dress, but after going through my wardrobe and throwing quite a few dresses on the bed i remembered i had this classic +Armani Exchange dress that i bought in New York 2 years ago for $20 - what a bargain. The dress is so lovely and light and is tiny dots of grey and blue with a matching reversible tie belt (not seen). It has 3/4 length sleeves and sits just on my knee. I have worn this dress a few times in emergencies and it never fails to look great. I wish that i had bought more designs whilst i was there. I matched the dress with my +Dune London Decorum T-Bar shoes in pewter with a 5" black contrast heel and as i didn't want to take a black clutch as i wanted to pop the blue in the dress i decided to use my Dune navy blue ipad case. This case was large enough for me to carry everything i needed for the day, including my Butterfly fold up pumps for the walk back to the train station. The look was finished off with a black fascinator that i had purchased in +Debenhams a few years ago, my classic +Ray-Ban Wayfarers and a slick of +Avon lipstick in Smitten Red, finished with my +Shellac Colors manicure. I wanted to take a camera that would fit in my bag, and remembered my new +Nokia 1020 phone in bright yellow has an excellent 40 mega pixel camera and has taken some great shots of the day.

Contents of My Derby Day Bag

Scarf - My Own Galloping Horse in Grey £10.00
Radley Purse
Sunglasses - As Before
Comb
Bag - As Before
Butterfly Fold Up Pumps
Nokia 1020 Phone
Avon Lipstick - Smitten Red
Bourjois 3D Effect - Framboise Magnific
A great day was had,  i had 2 wins, a great time with friends and came home to find that with my winnings the whole day had cost me £30.00 A nice cup of +teapigs lemon & ginger herbal tea and a well deserved feet up is now in order.


Don't forget all the scarves shown on my blog can be purchased from me for £10.00 each or 2 or more are £8.00 payment via PayPal. You can also find me on Facebook as Simply Scarves, Instagram as Simply Scarves and coming soon a revamped depop page